React - Week 3
Teaching this lesson?
Read the Mentors Notes here
What will we learn today?
Learning Objectives - React Week 3
Data fetching (advanced)
- Allow effects to update in response to prop changes
- Explain why a component with an effect dependent on props is broken with empty
useEffect()dependencies ([]) - Be able to fix a component with an effect dependent on props using the
useEffect()dependencies - Can describe the "lifecycle" of a component with
useEffect()when props change
- Explain why a component with an effect dependent on props is broken with empty
Forms
- Create a simple form in React using the controlled component pattern
- Can initialise state with
useState() - Be able to set the input
valueto the state variable - Can explain why the input does not change when typing if
onChangeis not set - Be able to update the state using an
onChangehandler
- Can initialise state with
- Use data from a submitted form to update the application
- Be able to handle an
onSubmitevent to the form - Be able to collect the form state variables and use them (setting state, POST request)
- Be able to handle an
Recap
Last week we looked at using props and state to create React components that change with user input (interactive example):
import React, { useState } from "react";

function Counter() {
  const [count, setCount] = useState(0);

  function increment() {
    setCount(count + 1);
  }

  return (
    <div>
      <p>You clicked {count} times</p>
      <button onClick={increment}>Click me</button>
    </div>
  );
}

export default Counter;
We also looked at fetching data in our React components (interactive example):
import React, { useState, useEffect } from "react";

const MartianPhotoFetcher = () => {
  const [marsPhotos, setMarsPhotos] = useState();

  useEffect(() => {
    fetch(
      `https://api.nasa.gov/mars-photos/api/v1/rovers/curiosity/photos?earth_date=2015-6-3&api_key=gnesiqnKCJMm8UTYZYi86ZA5RAnrO4TAR9gDstVb`
    )
      .then(res => res.json())
      .then(data => setMarsPhotos(data));
  }, []);

  if (!marsPhotos) {
    return null;
  } else {
    return (
      <img
        src={marsPhotos.photos[0].img_src}
        alt="Mars Rover"
        style={{ width: "100%" }}
      />
    );
  }
};

export default MartianPhotoFetcher;
Updating Data Fetching when Props Change
Last week we looked at how we could fetch data from an API and render it in our React applications. However, there was a problem with the method that we learned before. To understand this problem we first have to understand the lifecycle of a component.
The Circle of Life
Let's take a look at an example:
| Exercise A |
|---|
| 1. Open this CodeSandbox. |
| 2. Take 5 minutes to read the code. |
| 3. Click the "Fetch image for 2019" button. If you're feeling confident: predict what is going to happen before you click the button. |
| 4. Now click the "Fetch image for 2020" button. What did you expect to happen? What actually happened? Can you explain why? |
Together let's "play computer" to break down exactly what is happening with these components:
- When the page loads, the
Appfunction component is called - It doesn't have any
datestate already, so we initialise it to an empty string ("") withuseState It renders the 2 buttons, but because
dateis an empty string, it does not render theMartianImageFetchercomponent. Insteadnullis returned, which means that nothing is renderedfunction App() { const [date, setDate] = useState(""); ... return ( <div> <button onClick={handle2019Click}>Fetch image for 2019</button> <button onClick={handle2020Click}>Fetch image for 2020</button> {date ? <MartianImageFetcher date={date} /> : null} </div> ); }- When we click the "Fetch image for 2019" button, the
handle2019Clickclick handler is called - The state is set by
setDateto be"2019-01-01", and a re-render is triggered - The
Appfunction component is called again This time,
useStateremembers that we havedatestate and it is set to"2019-01-01"function App() { ... function handle2019Click() { setDate("2019-01-01"); } ... return ( ... <button onClick={handle2019Click}>Fetch image for 2019</button> ... ); }- Now
Appdoes renderMartianImageFetcherand passes thedatestate as a prop (also nameddate) - The
MartianImageFetcherfunction component is called for the first time useStateknows that we haven't got anyimgSrcstate so initialises it tonull- We queue an effect, which will run after we render for the first time
Because the
imgSrcstate is set tonull, we returnnull. This means that nothing is renderedfunction MartianImageFetcher(props) { const [imgSrc, setImgSrc] = useState(null); useEffect(() => { ... }, []); if (!imgSrc) { return null; } else { return <img src={imgSrc} />; } }- Now that the component has rendered for the first time, the effect is run
- A
fetchrequest is made to the NASA API (🚀!) When the request data comes back, we set the
imgSrcstate to a piece of the data, which triggers a re-renderfunction MartianImageFetcher(props) { ... useEffect(() => { fetch( `https://api.nasa.gov/mars-photos/api/v1/rovers/curiosity/photos?earth_date=${ props.date }&api_key=gnesiqnKCJMm8UTYZYi86ZA5RAnrO4TAR9gDstVb` ) .then(res => res.json()) .then(data => { setImgSrc(data.photos[0].img_src); }); }, []); ... }- The
MartianImageFetcherfunction component is called again useStateremembers that theimgSrcstate is set to the data from the API- This time, we do not queue an effect. We used an empty array (
[]) as theuseEffectdependencies argument which means that we only queue effects on the first render We do have
imgSrcstate set, so we render the image using the data from the API 🎉function MartianImageFetcher(props) { const [imgSrc, setImgSrc] = useState(null); ... if (!imgSrc) { return null; } else { return <img src={imgSrc} />; } }
Phew! That was a lot of work just to render an image! But we're not quite done yet, we still need to find out what happens when we click the "Fetch image for 2020" button:
- In the
Appcomponent, thehandle2020Clickclick handler is called - The
datestate is set to"2020-01-01"and a re-render is triggered - The
Appfunction component is called again and thedatestate is set to"2020-01-01" The
dateprop that is passed toMartianImageFetcheris different which means that it has to re-renderfunction App() { ... function handle2020Click() { setDate("2020-01-01"); } ... return ( ... <div> ... <button onClick={handle2020Click}>Fetch image for 2020</button> ... {date ? <MartianImageFetcher={date} /> : null} ... </div> ... ); }- In the
MartianImageFetchercomponentuseStateremembers that we already hadimgSrcstate. It is set to the image from 2019 - Again, we do not queue the effect because this is a re-render and
useEffecthas been passed an empty array[] Because
imgSrcstate has been set previously we render the image from 2019function MartianImageFetcher(props) { const [imgSrc, setImgSrc] = useState(null); useEffect(() => { ... }, []); return <img src={imgSrc} />; }
| Exercise B |
|---|
| 1. Did you spot where the bug was? Discuss with a group of 2 - 3 students where you think the bug is. |
| 2. Report back to the rest of the class where you think the bug happened. |
The key that the useEffect in MartianImageFetcher is only run once. This is because we told React that the queue should be queued on the first render only. However, as we saw, sometimes you need the effect to run again when some data changes. In this case the date prop, changed from "2019-01-01" to "2020-01-01", meaning that we have to fetch data different data. We call this a dependency of the effect.
useEffect dependencies array
To solve this problem, we can tell React to queue the effect on the first render and when a dependency changes. We do this by adding the dependency variable to the array (interactive example):
function MartianImageFetcher(props) {
  const [imgSrc, setImgSrc] = useState(null);

  useEffect(() => {
    ...
  }, [props.date]);

  ...
}
Now when the date prop changes, React knows that the effect must be run again, this time with the 2020 data. Because of this behaviour, the second argument to useEffect is called the dependencies argument. We use it whenever we have something in our effect that depends on a variable outside of the effect function.
To help you understand this better, try "playing computer" again, but this time think about what happens when we use [props.date] for the dependencies argument. Think carefully about what changes with step 6 after we click the 2020 button.
| Exercise C |
|---|
1. Open the pokedex React application from last week and open the src/BestPokemon.js file. |
2. Copy the BestPokemonSelector component from this CodeSandbox. Then paste it into src/BestPokemon.js. |
3. Change the default export so that it exports BestPokemonSelector instead of BestPokemonFetcher. |
4. Take a few minutes to read what the BestPokemonSelector component does. If you have questions, ask a Teaching Assistant to help. |
5. In the BestPokemonFetcher component change the URL to use backticks (`...` ) instead of double-quotes ("). Then replace the number 1 with ${props.pokemonId}. What will this do? Click here if you don't knowThe URL will contain the pokemonId instead of always fetching the pokemon with id of 1 |
6. Open your browser and find the BestPokemonSelector component. Before you click the buttons, think about what you expect will happen. Then click the "Fetch Bulbasaur" button to find out what actually happens. |
| 7. Refresh the page. What happens now if you click the "Fetch Bulbasaur" button, then click the "Fetch Charmander" button? Is this what you expected? Explain to someone why this happens. |
8. Fix the bug by adding props.pokemonId to the useEffect dependencies array in BestPokemonFetcher. Remember that you can test if the bug still happens by refreshing the page, clicking one of the buttons, then the other button. |
ESLint rules for React Hooks
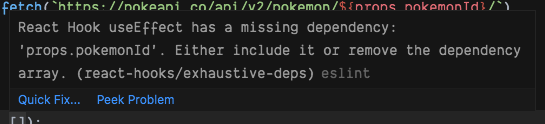
As you may have noticed, VSCode highlighted the empty dependencies array when you changed the URL passed to fetch in BestPokemonFetcher.
This is because your React application is using the rules from eslint-plugin-react-hooks, a package created by the developers who make React. It helps you to find bugs in React Hooks code by highlighting places where you might be missing dependencies.
If you see a red squiggly line underneath your useEffect dependencies array, you can hover your mouse over and it will tell you which variable is missing so you can add it to the dependencies array. Here's an example:
Loading state
| Exercise D |
|---|
| 1. Open this CodeSandbox. |
| 2. Click the "Fetch image for 2019" button and wait for the image to load. |
| 3. Now click the "Fetch image for 2020" button. Do you think this is a good experience for the user? Explain what you think is wrong to a Teaching Assistant. |
In the application above, the image from 2020 takes a while to load. This makes it feel like the app is broken: the user might think that they didn't actually click the 2020 button or that it is not working correctly. We are not telling the user that something is happening, it's just taking a bit of time to load.
We can fix this by adding a loading state. Let's take a look (interactive example):
function MartianImageFetcher(props) {
  ...

  if (!imgSrc) {
    return "Loading...";
  } else {
    return <img src={imgSrc} />;
  }
}
Previously, we were just rendering nothing (by returning null) when we didn't have any imgSrc. We can tell the user that this by instead rendering something telling them that we're still waiting for the data to come back.
There is still a problem though: when we click to fetch another image, we still have imgSrc set to the previous image. What we could do instead is set the imgSrc back to null when we know that we're fetching another image (interactive example):
function MartianImageFetcher(props) {
  ...

  useEffect(() => {
    setImgSrc(null);

    ...
  }, [props.date]);

  ...
}
| Exercise E |
|---|
1. Open the pokedex React application again and open the src/BestPokemon.js file. |
2. In the BestPokemonFetcher component, instead of returning null if there is no pokemon, return "Loading...". |
3. Now add setPokemon(null) inside the useEffect callback, before the call to fetch. |
| 4. Try clicking on the "Fetch Bulbasaur" and "Fetch Charmander" buttons quickly. Do you see the loading state? (It may only appear for a flash, the Pokemon API is very fast). |
Working with forms in React
Modern web applications often involve interacting with forms such as creating an account, adding a blog post or posting a comment. This would involve using inputs, buttons and various form elements and being able to get the values entered by users to do something with it (like display them on a page or send them in a POST request). So, how do we do this in React?
A popular pattern for building forms and collect user data is the controlled component pattern. A pattern is a repeated solution to a problem that is useful in multiple similar cases. Let's have a look at an example (interactive example):
function SimpleReminder() {
  const [reminder, setReminder] = useState("");

  function handleChange(event) {
    setReminder(event.target.value);
  }

  return (
    <div>
      <input
        type="text"
        placeholder="Some reminder"
        value={reminder}
        onChange={handleChange}
      />
      <p>Today I need to remember to... {reminder}</p>
    </div>
  );
}
We're controlling the value of the input by using the value from the reminder state. This means that we can only change the value by updating the state.
It is done using the onChange attribute and the handleChange function which is called every time the input value changes (typically when a new character is added or removed).
If we didn't call setReminder in the handleChange function, then the input's value would never change and it would appear as if you couldn't type in the input! Finally, the value we keep in the reminder state is displayed on the screen as today's reminder.
In addition, instead of just saving the value of the input in the state, we could have also transformed the string before we set it with setReminder, for example by calling toUpperCase() on the string.
Form with Multiple Fields
Let's have a look at a more complex example where we want to build a form to let users enter information to create a personal account (interactive example):
function CreateAccountForm() {
  const [userData, setUserData] = useState({
    username: "",
    email: "",
    password: ""
  });

  function handleChange(event) {
    const updatedUserData = {
      ...userData,
      [event.target.name]: event.target.value
    };

    setUserData(updatedUserData);
  }

  function submit() {
    console.log("Do something with the form values...");
    console.log(`Username = ${userData.username}`);
    console.log(`Email = ${userData.email}`);
    console.log(`Password = ${userData.password}`);
  }

  return (
    <div>
      <div>
        <input
          type="text"
          name="username"
          placeholder="Username"
          value={userData.username}
          onChange={handleChange}
        />
      </div>
      <div>
        <input
          type="text"
          name="email"
          placeholder="Email"
          value={userData.email}
          onChange={handleChange}
        />
      </div>
      <div>
        <input
          type="password"
          name="password"
          placeholder="Password"
          value={userData.password}
          onChange={handleChange}
        />
      </div>
      <button type="submit" onClick={submit}>
        Create account
      </button>
    </div>
  );
}
We now have three different inputs named username, email and password, and we keep each entered value in state as a field in an object. The method handleChange is reused to keep track of changes for all the values. The trick here is to use the name of the <input> element to update the corresponding state.
Updating an Object in State
Did you spot the strange syntax in handleChange?
We are using object spread syntax, which copies properties from one object to another. We are using this to update the state object but without mutating the original object.
Let's break this down into 2 steps. Here we create a new object based on another object, and adding a new property (interactive example):
const sherlock = {
  name: 'Sherlock Holmes',
};

const sherlockAfterMoving = {
  ...sherlock,
  address: '221b Baker Street'
};

console.log(sherlock);
console.log(sherlockAfterMoving);
We can also override a property if the keys are the same (interactive example):
const watson = {
  name: 'John Watson',
  address: '123 Fake Road'
};

const watsonAfterMoving = {
  ...watson,
  address: '221b Baker Street'
};

console.log(watson);
console.log(watsonAfterMoving);
Notice how Watson "moves" from "123 Fake Road" to "221b Baker Street"? Because the address key is in both objects, the second one "wins" and overrides the other key.
The second bit of new syntax ([event.target.name]) is called a computed property name. Inside a JavaScript object, you can use a variable wrapped in square brackets which acts as a dynamic key, such as (interactive example):
const theKey = "hat";
const theValue = "Deerstalker Cap"

const sherlockClothes = {
  [theKey]: theValue
};

console.log(sherlockClothes); // => { hat: "Deerstalker Cap" }
We are combining all of the concepts above to make a new object, that has all the same properties as the userData object, except for the property that is computed from event.target.name for the key and event.target.value for the value.
| Exercise F |
|---|
1. Open the pokedex React application again and open the src/CaughtPokemon.js file. In this exercise, instead of recording the number of caught Pokemon, we are going to record the names of each Pokemon you caught. |
2. Render an <input> before the <button> (hint: <input type="text" />). |
3. Create a new state variable called pokemonNameInput and initialise to an empty string (""). |
4. Add a value property to the <input> which passes the pokemonNameInput state variable. |
5. Create a new handleInputChange function. |
6. Add a onChange handler to the <input> that will call handleInputChange. |
7. Add a parameter called event to the handleInputChange function and add a console.log with event.target.value. In your browser, try writing something in the <input>. What do you see in the JavaScript console? |
8. Set the pokemonNameInput state variable to event.target.value. In your browser, try writing something in the <input>. What do you see? |
9. We are now going to save the user input when clicking on the <button>. Change the caughtPokemon state variable so that it is initialised as an empty array []. |
10. There should now be a bug in your app! The number of caught Pokemon has gone! To fix it, change from rendering caughtPokemon to caughtPokemon.length. Why did this fix the bug? |
11. We now need to change the catchPokemon function to add the pokemonNameInput state variable into the caughtPokemon array. (Hint: trying using the .concat() method, then calling setCaughtPokemon). |
12. Open your browser, type a Pokemon name into the <input> and click on the "Catch Pokemon" button. Can you see the number of caught Pokemon incrementing as you click on the button? |
13. Now we are going to display the names of the caught Pokemon. Instead of rendering caughtPokemon.length, create a <ul> element and use the .map() method on the caughtPokemon state variable to loop over each Pokemon and return a <li> element for each. |
14. Empty the <input> after clicking on the button. To do this, set the state of pokemonNameInput to an empty string "" after we have added it to the caughtPokemon array in the catchPokemon function. |
14: (STRETCH GOAL) Make sure the user cannot add a Pokemon to the caughtPokemon state if the value of pokemonNameInput state is empty. |
Homework
- If you haven't already, complete the in-class exercises on your
pokedexapp - Complete all of the lesson 3 exercises in the cyf-hotel-react project
- Try to complete the Stretch Goal exercises in the cyf-hotel-react homework
Complete a Project
Completed the above homework?
Speak to your Teachers about selecting a project from these challenges
It's really important that you get as much practice as possible in this module!