Lesson 0
![]()
What we will learn today?
CodeYourFuture
- Who we are?
- What will we learn?
- Read this Technology Survey from StackOverflow. Pay particular attention to the technologies we'll be teaching you (JavaScript, React, NodeJS)
- House Rules
- How we work?
- How we treat each other?
- Standup
Welcome
Welcome to CodeYourFuture and to the world of Web Development! Now that you have built a website in CodePen and learned the basics of HTML and CSS, it's time to learn about the tools that web developers use in their everyday job. These tools will be used during the course, so it is important that you become familiarised with them.
In order to get started, we would like you to try to complete a task at home:
move your CodePen website to a web address under
https://your-username.github.io/your-site-name.
In the process, you will learn how to store your code outside CodePen's website, in a location where other developers can make changes to it and view a history of all the updates that you have made.
If you wish to learn more about the concepts behind the steps we are suggesting below, please read the rest of this document.
And remember: it's ok if you are stuck and don't know how to continue. At any point, please ask for a mentor's help. We will cover these steps again in the lesson, and will explain them in more detail.
How to move your website to Github.io
- Export your website as a zip from CodePen
- Extract the contents of the zip file to a folder in your computer. Keep note of the location of this folder.
- Read about the terminal.
- Read about git.
- Install Git.
- Put the contents of the zip folder in a Gitub repository. How does Github work? (30min) >
- You should now have a page with your code under
http://github.com/your-username/your-repository-name. This is a view of your code, and you should see a list of your files, including anindex.html. Now all that remains is to publish your website! Still under
http://github.com/your-username/your-repository-name, find the settings icon in the top right corner.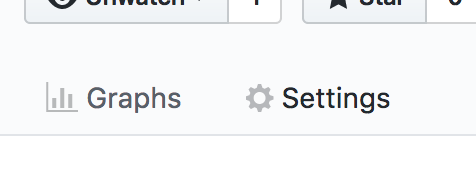
Find the section named "Github Pages" and select "master branch" in source, then hit "Save".
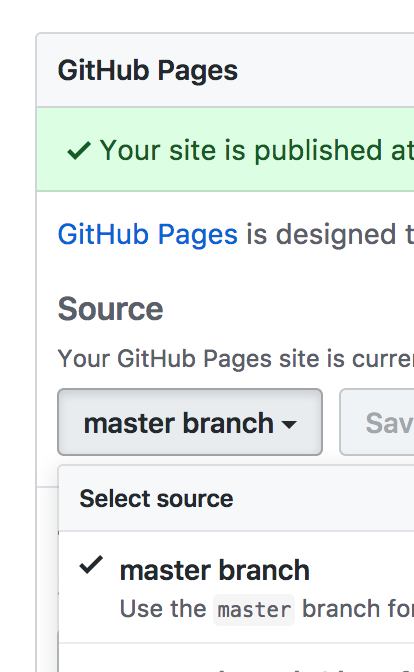
Wait a few minutes, then refresh the page and come back to the Github Pages section. You should see a green bar saying "Your site is published at
http://github.com/your-username/your-repository-name". Click the link, verify that your website is there, then share it with your CYF class!
Terminal basics
During your course journey and onwards, the terminal (also known as command line) will be one of your most valuable tools. It will help you to interact with you computer faster, by helping you to:
- Create and delete files.
- Install web development tools.
- Start a server.
- Use source control (explained later in this lesson).
All this will make sense as we progress with the lessons. For now, we would like you to get familiar with it by following this tutorial:
How do I use it on my computer
So now that you know what the terminal can do for you, how do you use it? Please
find instructions for your operating system below. After you have followed the
instructions, open a terminal and write ls, then press the Enter key. You
will see something like this:

Commonly used commands
There's a set of commands you should become comfortable with during the course to allow you to effectively move around the filesystem and write software on your laptop.
cd- change directory. To move up into the parent directory use:cd ..ls- list the contents of a directory. Can also be used asls [directory_name]to list the contents of a specific directory without actually moving (withcd) to itpwd- print the full location of your current directorymkdir [name]- create a new directory, with the givennameafter a spacetouch [file_name]- create a new file, with the given name (don't forget to add the extension, like.cssor.html)rm [file_name]- remove a filerm -r [directory_name]- remove a directory (and all files inside that directory)
Linux
The Terminal is already installed. It should be in the list of applications available in your computer. More instructions
macOS (Apple)
The Terminal is already installed. It should be in the list of applications available in your computer. More instructions
Windows
Install Git. It will bring with it a tool called "Git Bash". When the mentors ask you to open a terminal or command line, please open "Git Bash".
Git
We will use Git as our Version Control System (also known as Source Control). It's like Dropbox for developers. But much better!
What is "version control"? Version control is a system that records changes to a file or set of files over time so that you can recall specific versions later.
It allows you to revert files back to a previous state, revert the entire project back to a previous state, compare changes over time, see who last modified something that might be causing a problem, who introduced an issue and when, and more. Using a VCS also generally means that if you screw things up or lose files, you can easily recover. In addition, you get all this for very little overhead.
Extract from Git Pro book
This answer on StackOverflow by si618 explains very well why we use Version Control.
So what is Git? Git is one of many Version Control Systems available to use, and by far the most popular.
What is Github? Github is a very popular site where you can publish and share your Git repositories, share and collaborate with other people.
Get Started
Follow this tutorial from Github to setup Git: https://help.github.com/en/articles/set-up-git
Then learn how to use git from the Terminal
Try completing this tutorial as well to learn more intermediate features, like branching.
A typical workflow
If you're basing your work from another project, the first step is typically to fork their repo. Read this guide for instructions: https://help.github.com/en/articles/fork-a-repo
If you're starting a new project then you should follow these steps https://help.github.com/en/articles/adding-an-existing-project-to-github-using-the-command-line
Using Git through the Terminal
git initif it is a new project, i.e. a project not cloned from a repo (or a fork of a repo)git add .to add local files to the indexgit commit -m "Good explanation of your file changes"to commit files to the local repogit remote add origin GitRepoRemoteUrlif it is a new project (to setup the remote url)git remote -vto verify that the remote url is set correctlygit push -u origin masterto push your commits to the remote url (Github in our case)
You will also typically need to set up your email and name once
when you install Git git config --global user.name <name> and
git config --global user.email<email>.
Using Git through a graphical interface
If you don't feel comfortable with the terminal just yet, download the Github client. If possible, however, we recommend becoming comfortable with the Terminal commands and understanding the steps for the different workflows before moving on to visual Git clients.
Pull Requests
You should also learn how to create and work with Pull Requests.
Github
During our course, we will be using Github to store our code. Github is the most popular Git service around, and is used by many large companies, like Facebook, Airbnb and The Guardian.
More Resources
- Follow this tutorial to learn the basic Git commands: https://www.pluralsight.com/courses/how-git-works
- Another good resource: Git - the simple guide: https://rogerdudler.github.io/git-guide/
- A more detailed tutorial that goes into advanced topics of Git: https://www.atlassian.com/git/tutorials/what-is-version-control
- You can also check this visual explanation of different commands and what they do: http://ndpsoftware.com/git-cheatsheet.html#loc=workspace
- There are GUI software - Gitkraken is one of them: https://www.gitkraken.com/
- This Glossary has definitions of the terms normally used with Git: https://help.github.com/en/articles/github-glossary
IDE
IDE stands for "Integrated Development Environment". It is the software that you will be using to write most of your code. It is designed to help you develop your apps quickly, focusing on the problems that you need to solve instead of having to search Google for minor details.
Auto-complete
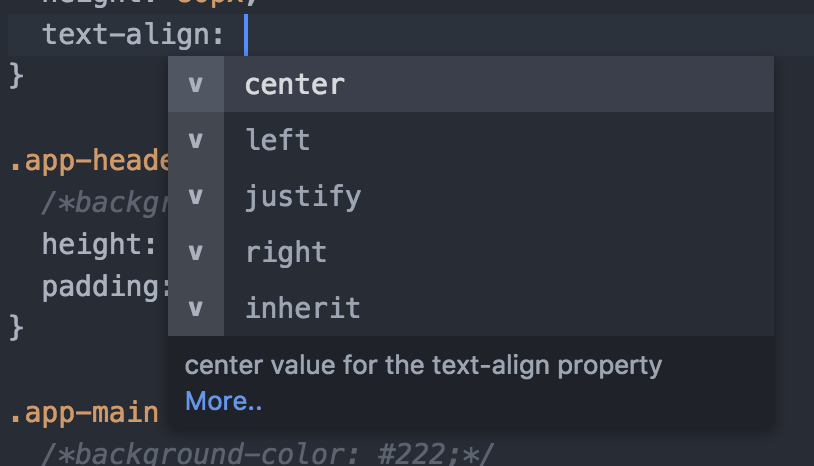
One of the most important features of an IDE is that it provides "auto-completion". This means that it will give you suggestions of what you can can write next, while you are typing something.
For example, when writing a CSS property, it will tell you what values you can assign it to.
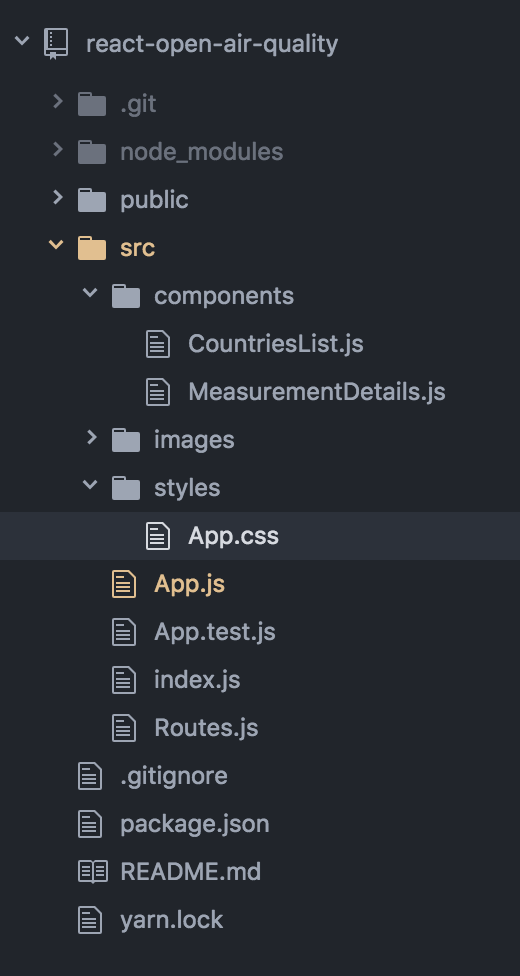
File tree view
The reason why we call it "Integrated" is that you almost don't need to leave the window to write your app. For example, creating, renaming and moving files can be done directly from the IDE. This functionality can be achieved from something called a "Tree view", which you can usually find on the left side of your IDE.
Finding files
When working with big projects, you will often need to find a file quickly, without having to go through the tree view manually.
Most IDEs will allow you to do this with a sequence of keys.
VSCode sequence: Windows/Linux Ctrl + P | Mac Cmd + P
Install an IDE
For this course, we recommend the usage of VS Code. Please go ahead and install it, then try opening an HTML file with it via File > Open.
Other IDEs
Besides VS Code, the IDEs below are also popular with web developers. Feel free to check out their websites and see the differences between them and VS Code.
Airtame
During our classes, Students and Mentors will share their code with the rest of the class using a tool called Airtame to present their laptop screen wirelessly to the projector. The instructions below were tested on Ubuntu only. Installation will differ on Mac OSX.
To install Airtame:
- Download the Airtame version for Ubuntu here.
In the Terminal, navigate to the directory you downloaded the file. For example, if you downloaded Airtame to your
Downloadsdirectory:$ cd ~/DownloadsThe downloaded file should have
.tar.gzextension. You can see the full name with:$ ls airtame*Extract the file using:
$ tar -xzf <filename>replacing<filename>with the name of the downloaded file.The command above will extract the contents of the downloaded file into a directory of the same name.
Launch Airtame with the following command:
$ ./<airtame-dir>/launch-airtame.shreplacing<airtame-dir>with the directory created in the previous step.Install Airtame with the following command:
$ ./<airtame-dir>/install.shThis will create a shortcut (icon) so you can launch Airtame from your Applications
Common Issues
If you have errors returned when executing launch-airtame.sh or install.sh you may need to install
one or more missing libraries in your System. Check the error message and:
- If it contains
libgtk-x11as part of the message, then execute the following command:$ sudo apt-get install libgtk2.0 - If it contains
libgconfas part of the message, then execute the following comand:$ sudo apt-get install libgconf2.0
For any other errors, contact the Mentors on Slack, including the error message from the Terminal.
Homework
- If you have not yet moved your website from CodePen to Github, do it now. Please use the information in this section to complete it.
- When your website is live at
https://your-username.github.io/your-site-name, please send a link to the slack channel of your class. - Learn how to navigate your computer using a Terminal (view files, copy files).
- Install VS Code.
- Open your website with VS Code and add something to it: text, images, update
CSS. Commit your changes to Github and verify that
https://your-username.github.io/your-site-namehas been updated!
It's alright if you are getting stuck or if something doesn't look right! When it happens, please ask your mentors or classmates for help in Slack.