HTML/CSS 1
Teaching this lesson?
Read the Mentors Notes here
Contents
- Semantic HTML tags
- CSS selectors, CSS cascade, Pseudo-classes such as
:hover/:focus - Box model:
margin/padding/borderetc...
Learning Objectives
Learning objectives for this lesson can be found here
What makes a web page?
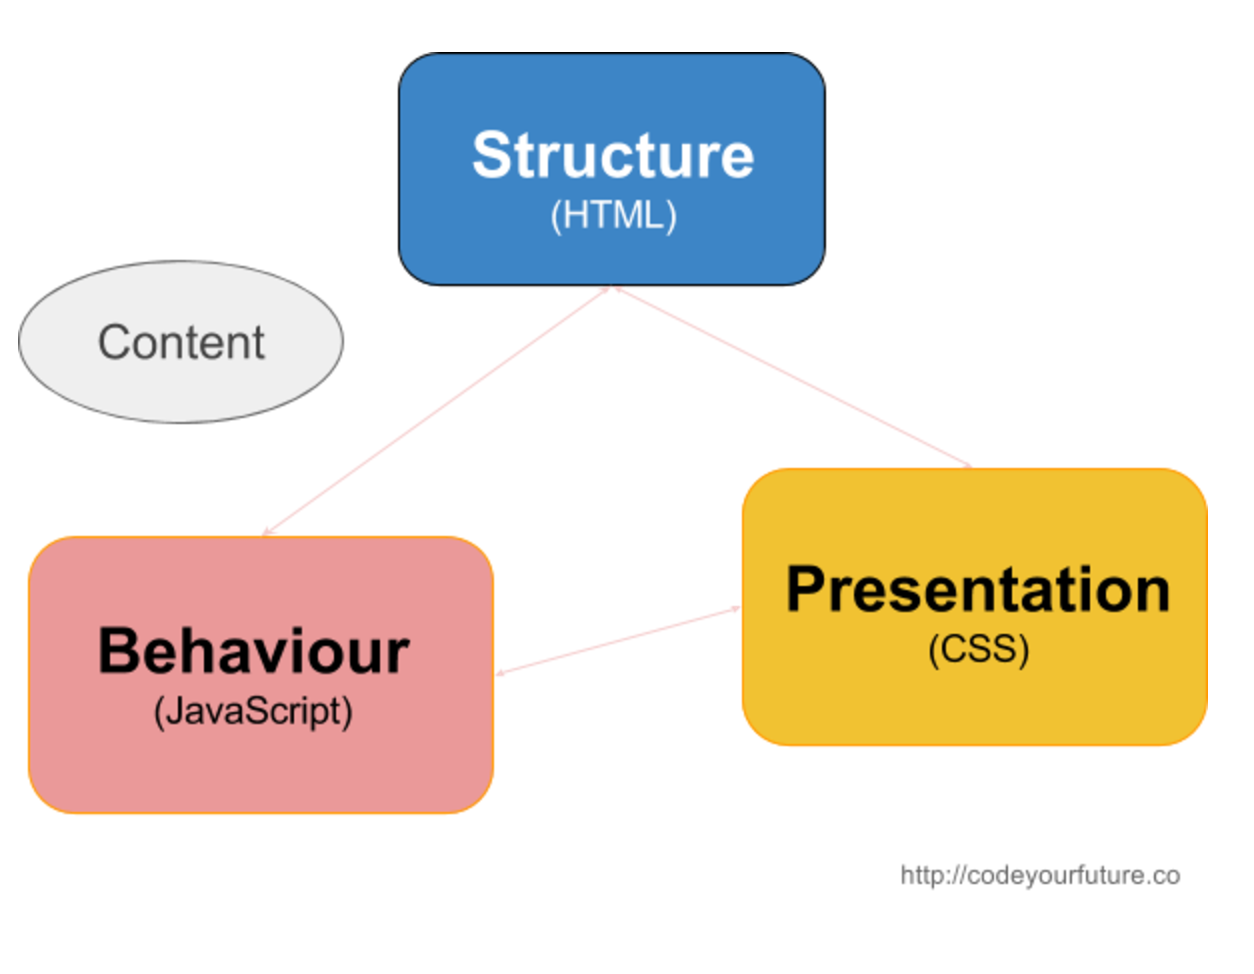
Separation of Concerns: In computer science, separation of concerns (SoC) is a design principle for separating a computer program into distinct sections, such that each section addresses a separate concern. (Wikipedia)
Principles - During the course, we will highlight principles that apply to the specific topic but also to Computer Science and Programming in general. It is important to understand these principles, terms and apply them to your thinking in general.
HTML Syntax
You're already familiar with HTML code from your application process. If you want to refresh your memory, read this quick guide to the HTML syntax.
All together, let's review the basic syntax in the following example:
<article>
  <h1>Learning HTML</h1>
  <p>Get to know the HTML basics.</p>
  <a href="http://html5rocks.com">Read Article</a>
</article>
Exercise Which parts are the Tags and which parts are the Attributes.
HTML tags are arranged in a hierarchy. This is sometimes called "nesting" tags or creating an HTML "tree". Between the opening <article> tag and the closing </article> tag there are three other tags. We call these "child" tags, because they have a parent-child relationship.

Exercise As a group, let's try to name all of the parent and child tags in the following example.
<article>
  <h1>Learning HTML</h1>
  <p>
    <span class="author">Author:</span>
    <a href="http://codeyourfuture.io">Code Your Future</a>
  </p>
  <p>Get to know the HTML basics.</p>
  <a href="http://html5rocks.com">Read Article</a>
</article>
Example HTML/CSS Project
In today's class, we will begin adapting styles on this example website. We'll review some of the HTML/CSS basics you already encountered during your application process and learn some new techniques. By the end of the third lesson, we will have worked together to improve the example site on the left so that it looks like the screenshot on the right.


The example website you'll begin working with is available on this Code Your Future GitHub repository - Bikes for Refugees. Fork the repository to your personal account and use the following terminal commands to download the files to your projects folder.
cd ~cd <your-project-directory>git clone git@github.com:<your_username>/bikes-for-refugees.git
Exercise: Spend a few minutes exploring the
.htmland.cssfiles for this page. Why don't we put everything in one file?
Semantic HTML
When writing HTML code, you can use different tags to describe the content. Is it a navigation menu, a paragraph of text, or an article? By using the correct tag, you help search engines like Google or screen readers for the visually impaired.
Semantic HTML is the use of HTML markup to reinforce the semantics, or meaning, of the information in webpages and web applications rather than merely to define its presentation or look. Wikipedia
We'll cover the following semantic tags:
<header><footer>- The
role="main"attribute <nav><article><aside role="complementary">
Exercise (pair programming): Work in pairs to determine where to place these new Tags and Attributes in the index.html file. Who benefits when we write "semantic" HTML?
CSS Selectors
During your application process, you became familiar with CSS selectors. We'll review the basic selectors and then practice combining these to modify our button styles.
If you want to review the selectors, read the Common Selectors section of this page.
Exercise (pair programming): Work in pairs to make the blue buttons on the page red (
#ce5f31). The white button, which says "Volunteer", should remain white but the text should change to red.
Pseudo Classes
You can assign CSS rules to a class like this:
.btn {
  background: #ce5f31;
}
There are also things called "pseudo" classes. In this section, we'll introduce you to the common pseudo classes for assigning styles to interactions, such as moving your mouse over a link.
"pseudo" is a fancy word for "fake". We call them "pseudo" classes because they're not really there in the HTML, but the browser knows what to do with them.
Here's an example of a pseudo class which changes the color of a link when the mouse moves over it.
.btn:hover {
  background: #ef7f52;
}
Not everyone uses a mouse. Some users will prefer a keyboard, where they can hit tab to move between links on a page. So that they can see where they are, you should add effects to the :focus pseudo class too.
.btn:hover,
.btn:focus {
  background: #ef7f52;
}
Exercise: Work in pairs and use the pseudo classes to make the background color of the red buttons change when in a "hover" or "focus" state. See if you can make the white "Volunteer" button change to a different background without effecting the red buttons.
Box Model
In CSS, everything is a box. An image is a box. A link is a box. The area around this box can be modified with properites that we call margins, borders and padding. Here's a diagram showing what the box looks like.

Exercise: Work in pairs and use the
marginandpaddingrules to spread your navigation links out a bit wider. There should be a small gap between them and enough padding so that the border is not too tight on the text.
You may have noticed that the border you added to the navigation links causes the links to jump around when you move your mouse over them. That's because the border is adding to the width of the box model, pushing the others to the side.
You can also set a transparent border, so that it takes up the space without showing a visible border.
.navlink {
  border: 1px solid transparent;
}
Exercise: Use a transparent border so that the width of each navigation menu item stays the same even when it is hovered or focused.
Git Conflicts
As a professional, you'll usually need to work alongside other coders to build an app or website. We use version control to coordinate changes and manage any conflicts that arise. Git is a version control system which helps us merge code that we've been working on separately into one common codebase.
To manage conflicts, we will need a common code base in which all changes are coordinated. When working on our own, we'll make our changes in branches to keep the code separate. Then we'll learn how to refresh your individual branch with the common code base, and prepare your changes to be merged.
Exercise: Get together in pairs and select a "leader". The leader should fork this repository to their GitHub account. The other person should then fork the leader's repository. Both students should then clone their own personal forks locally.
Now that you have the project set up on your computer, you need a place to safely make changes without effecting the common code base. To do this, we'll navigate to our project in the Terminal and create a new branch:
cd <your-project-directory>
git checkout -b my-first-branch
When you commit changes on this branch, your changes will be saved separately from the common code base. This way both team members can make changes at the same time.
Exercise: Add your name and a sentence about yourself to the
index.htmlfile. Thengit addandgit committo commit to your personal branch.
Now you have two branches: master and my-first-branch. These branches have diverged, which means you have changes in one that don't appear in the other. You can check this by running git checkout master, then looking at your index.html file.
When you're done, run git checkout my-first-branch to go back to the branch with your changes. Git saves your changes in both branches and lets you switch between them. That's why we call it "version control". It saves different versions so you can switch between them.
Right now, your new branch only exists on your computer. Let's push it up to GitHub so you can see it in your profile.
git checkout my-first-branch
git push -u origin my-first-branch
Now both students in each pair, the "leader" and the other student, should have branches with changes. Now let's try to merge these changes together into the "leader's" master branch.
Exercise: Browse to the "leader's" GitHub repository and open a new Pull Request. The Pull Request should ask to merge your
my-first-branchbranch into the "leader's"masterbranch. Ask a mentor for help if you have trouble figuring out how to issue a Pull Request. When both students have issued a Pull Request to the correct place, merge one of them but not the other.
Congrats, you've merged one student's changes with the common code base in the master branch. If you check the other Pull Request, you'll see you have a problem. It can't be merged automatically because there's a conflict. Why?
Conflicts emerge whenever the same file has been edited, and git can't determine what changes should be kept and what changes should be discarded. A human -- that's you -- needs to step in and sort it out. To help us, git writes into our code so we can see where it is confused. Here's an example of a merge conflict in our code:
<<<<<<<  HEAD
+   <h2>Mozafar</h2>
+   <p>I am a mentor at CodeYourFuture.</p>
=======
-   <h2>Daniel</h2>
-   <p>I like to ride bikes</p>
>>>>>>> my-first-branch
To resolve a conflict, we decide which lines to keep and which lines to remove. When we're done, we remove the extra lines that git added (<<<<< HEAD, ======== and >>>>>>>).
Let's see how we can resolve this conflict with your branches. First we need to fetch the latest changes from the leader's master branch. If you're the leader, just do:
git checkout master
git pull
If you're the other student, you need to set up the remote and pull from that master:
git checkout master
git remote add upstream <your-leaders-git-repository-url>
git pull upstream master
Now everyone's master branch should include the Pull Request that was merged. Whichever student still needs to get their Pull Request merged can bring those changes into their branch like this:
git checkout my-first-branch
git merge master
You probably received a merge conflict.
Exercise: Follow the steps we discussed before about how to resolve a merge conflict by editing the file. Make sure both students changes are included in the final version. When you're done, use
git add,git commitandgit pushto share your changes with GitHub. If everything has gone correctly, you can now merge the Pull Request.
Now everyone can sync their changes. If you're the leader, just do:
git checkout master
git pull
If you're the other student, do this:
git checkout master
git pull upstream master
Exercise: As a group, discuss why the
git pullcommand is different for the leader and the other student.Exercise: Try to do the pull requests again, but this time switch the pull requests so that the other student must manage the merge conflict.
If you're feeling confused, don't worry. Version control is one of the most difficult things you'll learn and we'll be going over it again and again and again.
Resources
- HTML5 - semantic elements
- CSS Selectors - MDN
- The Cascade - MDN
- Box Model - MDN
- Box Model, box-sizing: border-box - CSS Tricks
- CSS specificity - MDN
- Pseudo classes - MDN
Homework
You can find the homework for this week here
Prepare for the next class
- (Est. 4-5 hours) Complete the first three lessons in this course on Responsive Web Design Fundamentals. You should complete Why Responsive?, Starting Small and Building Up. Don't worry if you don't have a phone you can use for Remote Debugging. You can use the browser's Device Emulation instead.