JavaScript Core II - Week 2
Teaching this lesson?
Read the Mentors Notes here
Contents
Learning Objectives
By the end of this lesson students should be able to:
- Define what the DOM is and what it does
- Use query selectors to retrieve elements from the DOM
- Use event listeners to respond to events that happen on the DOM
- Create DOM elements using JavaScript and add them to the DOM
- Manipulate DOM elements using JavaScript to change their properties
Please make sure you're working on the js-exercises repo Week 5 during this class.
JS in the Browser
Up until now we've been using console.log to see the results of our code running, because it allows us to focus on writing code and seeing the results instantly. But JavaScript was not meant to be run in console.log: it was meant to make web pages dynamic.
Lots of websites are powered by JavaScript today, and some (like Facebook) cannot function at all without it: it's become that important to the look and feel of the website.
The DOM
Your webpages are made up of a bunch of HTML elements, nested within each other (parents and children). But JavaScript doesn't know about any of that.
Thankfully, in JavaScript we have access to this "DOM" object (Document Object Model) which is actually a representation of our webpage that JavaScript can work with.
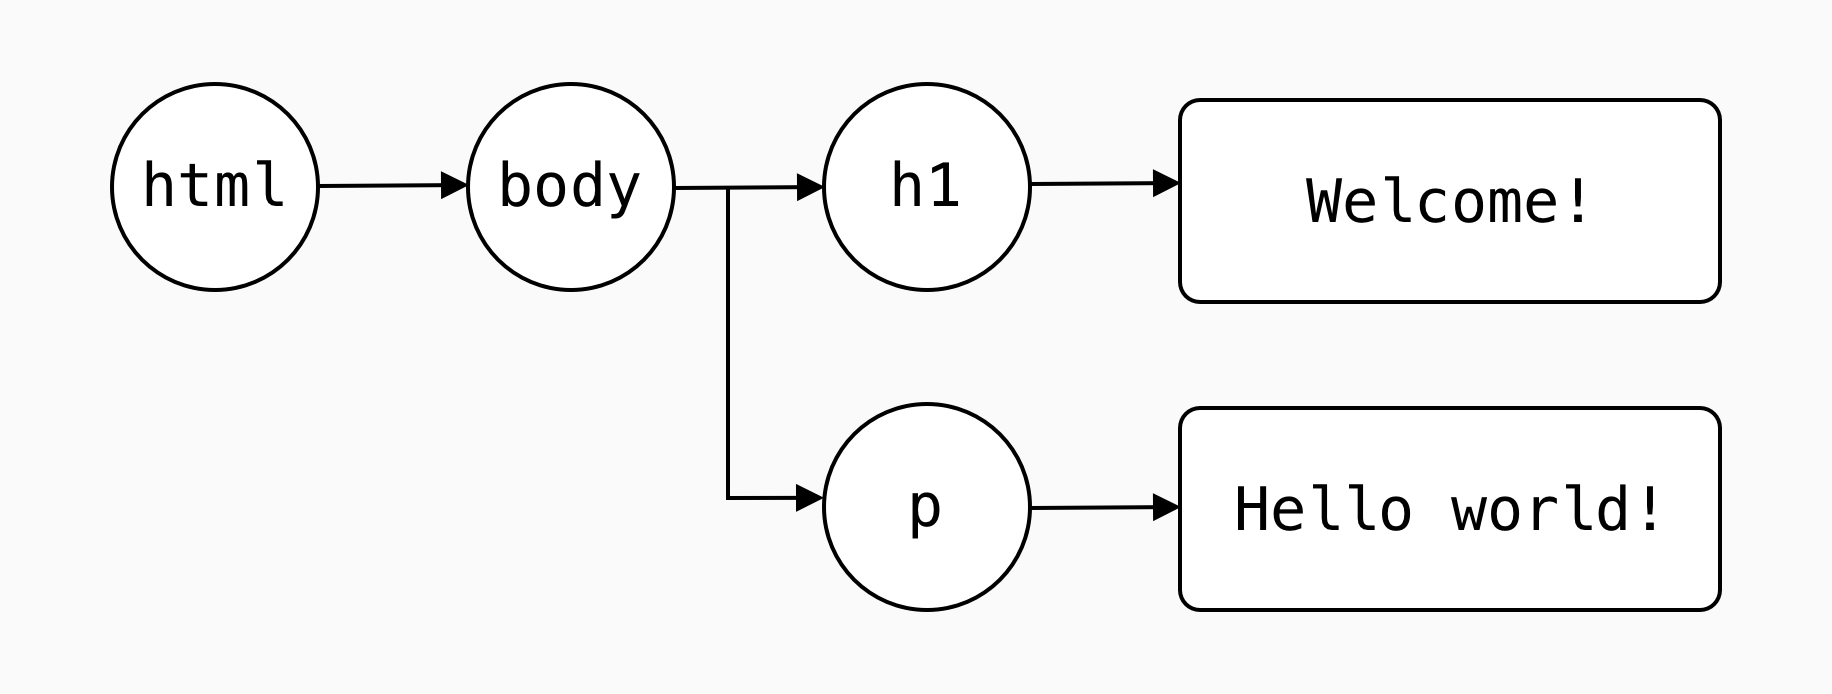
Here are two examples, HTML and then JavaScript, of how the DOM might look like:
<html>
  <body>
    <h1>Welcome!</h1>
    <p>Hello world!</p>
  </body>
</html>
let document = {
  body: {
    h1: "Welcome",
    p: "Hello world!",
  },
};
This is how we would represent the document hierarchy above as a tree of nodes:
Access DOM elements
The DOM offers a lot of useful functions we can use to find elements on the page. Here are some we'll be using today:
document.querySelector("#mainHeader");
document.querySelectorAll("p");
Both .querySelector and querySelectorAll accept a CSS selector as an input.
.querySelector selects only the first element it finds, querySelectorAll selects all elements (it returns a NodeList, which you can think of as being similar to an array; it is an ordered sequence of DOM elements which you can loop through like with an array. The difference is that many common array methods like .map or .concat can't be used on a NodeList. To turn a NodeList into an array, you can use Array.from, e.g. let elementArray = Array.from(document.querySelectorAll("div"));).
Preparation for exercises
Let's work on the code provided here: https://github.com/CodeYourFuture/js-exercises/tree/master/week-5/InClass/A-dom-manipulation
- Open "A-dom-manipulation" project in VS code
- You will have to work on the
exercise.jsfile for today's homework- View your changes by
- using vscode-live-server plugin to get live updates of your changes.
- Install the plugin
- Right click on
index.htmland select "Open with Live Server"- or just open the
index.htmlon your browser and refresh every time you change your code
Exercise (1)
/*
Task 1
=======
Write JavaScript below that logs:
    1. all the "p" element nodes of the document,
    --> should log a list of nodes with a length of 6

    2. the first div element node
    --> should log the ".site-header" node

    3. the element with id "jumbotron-text"
    --> should log the "#jumbotron-text" node

    4. all the "p" elements contained inside  the .primary-content element node
    --> should log a list of nodes with a length of 3

*/
Attach events to DOM elements
Once you retrieve an element using .querySelector, you can attach an event to it. An event is any action that can be performed on that element. For now, we will just use the click event:
let myButton = document.querySelector("#myButton");
myButton.addEventListener("click", alertSomething);

function alertSomething() {
  alert("Something");
}
You will notice in the example that we passed a second argument to addEventListener. That second argument is the function that we want to invoke when that event has happened.
Exercise (2)
/*
Task 2
======

When a user clicks the "ALERT" button, an alert box should pop up with the text "Thanks for visiting Bikes for Refugees!"
*/
The elements returned by document.querySelector have the same properties as a normal HTML element: for example, you can get access to their css styles.
let myElement = document.querySelector("#myElement");
myElement.style.backgroundColor = "red";
Exercise (3)
/*
Task 3
=======

Write JavaScript below that changes the background colour of the page when the "Change colour" button is clicked.
*/
Create DOM elements
Using the document, you can also create new elements. These elements will not appear until you append them as a child of another element though:
let paragraph = document.createElement("p"); // here we're just creating it, element is not visible yet
myElement.appendChild(paragraph); // now the element is added to our view, but it's empty
document.createElement accepts as an input any element type. So for example document.createElement("article") will create a new article element.
Exercise (4)
/*
Task 4
======

When a user clicks the "Add some text" button, a new paragraph should be added below the buttons that says "Read more below."
*/
Manipulate DOM elements
You can then change the text displayed inside elements using the innerText property:
paragraph.innerText = "How are you?"; // now we can see the text displaying on the screen
We've been using document.querySelector to retrieve a single element.
To retrieve a list of multiple elements (that match a specific class name for example, or a specific tag) we use document.querySelectorAll.
//change the background of all the paragraph items on our page
let paragraphs = document.querySelectorAll("p");
for (let i = 0; i < paragraphs.length; i++) {
  paragraphs[i].style.backgroundColor = "blue";
}
We've learned that style and innerText are properties of DOM elements. Image tags can also have width and height.
While it's really easy to change styles directly on elements using the style property, it is not usually a good idea to mix JavaScript and CSS (see separation of concerns in the first lesson). To solve this, we can use the className property to set the class for an element instead of changing its styles directly:
//before: <div id="myContainer"></div>
let container = document.querySelector("#myContainer");
container.className = "largeBlock";
//after: <div id="myContainer" class="largeBlock"></div>
To get the text from an Input field:
let updateTitleBtn = document.querySelector("#updateTitleBtn");

updateTitleBtn.addEventListener("click", function () {
  let inputBox = document.querySelector("#titleInput");
  let title = inputBox.value;

  let titleElement = document.querySelector("#lessonTitle");
  titleElement.innerText = title;
  inputBox.value = title;
});
The above waits for click on a button. When the button is clicked, it gets the input box element (inputBox variable).
To get the entered text from it, we use the value property: let title = inputBox.value.
Exercise (5)
/*
Task 5
======

When the "Larger links!" button is clicked, the text of all links on the page should increase.
*/
Homework
- The repo contains few challenges - solve all the pending exercises in
week-5.