Node - Week 1
Teaching this lesson?
Read the Mentors Notes here
Learning Objectives
By the end of this lesson students should be able to:
- Define what an API is used for
- Use Glitch to deploy and edit
expressservers - Use
npmto start a node server - Explain what
expressis and what it is used for - Use
expressto create an API that will accept aGETrequest that returns JSON - Implement routing to return different resources depending on URL
- Implement query params to return different content (?query=ses)
API Refresh (20 Minutes)
Group exercise (5 minutes)

Exercise: Discuss known APIs

1. Groups discuss any APIs they know about.
2. What might you do with it?
3. Announce answers to class.
Before we make our own API, let's look at and use some other APIs.
Here's an example API that shows us the Sunrise and Sunset times of everywhere in the world.
Next let's try an exercise
Group exercise 5 minutes: experiment with existing APIs

Pick a couple of these and experiment with them, modify the requests, report your findings.
- http://www.tvmaze.com/api
  - e.g. http://api.tvmaze.com/shows/82/episodes
- Sunrise/Sunset times: https://sunrise-sunset.org/api
  - e.g. Sunset in Bethnal Green: https://api.sunrise-sunset.org/json?lat=51.5311&lng=0.0481
- Google Books API: https://www.googleapis.com/books/v1/volumes?q=isbn:0747532699
- Star Wars API: https://swapi.co/
  - e.g.https://swapi.co/api/people/1/
- UK Police Data. https://data.police.uk/docs/
  - e.g. street-level crimes, Old Street, London: https://data.police.uk/api/crimes-street/all-crime?lat=51.5268&lng=0.0866
- iTunes Search API: https://affiliate.itunes.apple.com/resources/documentation/itunes-store-web-service-search-api/
  - e.g. All Beyonce's music videos: https://itunes.apple.com/search?term=beyonce&entity=musicVideo
- CYF resource-library https://resource-library.codeyourfuture.io/api/resources
- (Difficult) Wikipedia API: https://en.wikipedia.org/w/api.php?
So what's the big deal? I can see this information on web sites already!
What's an API and how is it different from a web site?
Intro to Node on Glitch
Running a very simple web-server
Run the simplest web server code.
We've made a really simple server about cats. You can check it out here:
Let's inspect the different parts of the Node App and how Express works. Let's discuss
requireon Line 1express()on Line 2app.get()on Line 10app.listen()on Line 15response.sendFile()on Line 6 and Line 7
Can we work out what each those lines are doing?
In-Class Exercise
As a class - try to make a simple express server.
You can pick any theme you like but maybe try
- The class' favorite foods
- The class' favorite songs
- or get ideas from the class!
Now let's make a server ourselves from scratch.......
Exercise: Make your own node server (on glitch)
All students should "remix" this one for a simple start: https://glitch.com/~cyf-simple-express
Have them it read and modify it to do something different.
1. Login to Glitch and ‘remix’ this project and rename to be yours
2. e.g. say "Hello Miles", instead of "Hello Kash"
3. Make it return an array of strings as json.
4. Make it return the current time
5. Advanced: make it return whatever you want! 3 minutes.
Make a Node API
The rest of today's lesson is a workshop.
In small groups complete each of the steps below. At different points, the teacher will introduce new concepts.
Get Started
Fork and clone the repo https://github.com/CodeYourFuture/Node-Starter-Kit.
It is an empty project that includes all the details you need to get started building your first Node App.
Download Postman
Postman is a tool that helps us test and develop APIs.
Download and install Postman.
Step 1 - Installing The Project
We're going to use the Node Package Manager (npm) to
setup the project using the npm install command.
NPM is the place to go to download other Node code written by other people. There are thousands of open-source, 3rd-party Node modules (also known as packages) written by other people that you can download and use in your own projects.
Run the following command in your terminal:
npm install

Step 2 - Building the server
The first thing we need to do is build our server. You will always need to build a server when writing back-end code. A server can be built in pure Node.js, but Express is simpler to work with.
1. Create a server.js file
Let's build our server! Before we do anything, let's create a new file called
server.js. This is where all our server code is going to live.
2. require the express library
We already installed Express in Step 2, but we need to make sure it is included
in this file specifically so we can use its methods. In Node.js, when
you want to use a package in another file, you must require it.
To require Express, write the following inside server.js:
const express = require("express");
Let us get used to ES6 syntax - so use
constandletinstead ofvar, arrow methods instead of functions, etc...
3. Initialise the server
To initialise our server, we need to call the express() function. This
will create an Express application for us to work with.
Add the second line of code to your server.js file:
const express = require("express");
const app = express();
4. Start 'listening' for potential requests
One more step left, we need to set a port for our server to listen to. Think of a port as a door number; any requests that come to the server will come via that door. Setting a port will allow us to find where our server is running.
We use the app.listen method to do this. This method takes two arguments:
a port and a callback function telling it what to do once the server is
running.
Need clarification? Read more about the
app.listenmethod in the Express documentation.
We're going to run our server on port 3000, and add a simple console.log in the callback function. Update your server.js file, calling the app.listen method:
const express = require("express");
const app = express();

app.listen(3000, function () {
  console.log("Server is listening on port 3000. Ready to accept requests!");
});
Try to use ES6 arrow functions instead of
function.
5. Switch the server on!
You've built your server, but it isn't running yet. We need to run a command in
the terminal to do this. We are going to use the node keyword to run the
server file.
Type the following command in your terminal:
node server.js
If you see this, congratulations! You have built yourself a server!

6. npm script
To exit the running the server, type crtl + c. Instead of running the server with node server.js everytime, we can create an alias for it in package.json.
Under the scripts property, add start: node server.js. We can now run our server using npm start which will be an alias (a shortcut) to node server.js.

Go to the terminal and type npm start and make sure that the server still runs.
Step 3 - Communicating with the server
Now that we've built the server, we need to communicate with it. We are going to control the server with handler functions.
What is a handler function?
When a request reaches the server, we need a way of responding to it. In comes the handler function. The handler function is just a function which receives requests and handles them, hence the name.
The handler function is always called with a request and response object. The response object is what gets sent back to the client. It contains the information that gets displayed in the web page. You can decide what to send back in your response.
What does a handler function look like in Express?
The get() method is one of the methods used to
define a handler function in Express. It takes two parameters: the endpoint
at which to trigger an action (we'll explain more about this in the next step),
and the handler function that tells it exactly what to do. Here's a simple
"Hello World!" example:
// req is the Request object, res is the Response object
// (these are just variable names, they can be anything but it's a convention to call them req and res)
app.get("/", function (req, res) {
  res.send("Hello World!");
});
Here, we are telling our server to respond with "Hello World!" when someone tries to access the webpage.
1. Create your own handler function.
Let us add a handler handler function to send back a message to the client. To do that,
we're going to use the Express send()
method. This will update the
response object with the message.
Update your handler function like so:
const express = require("express");
const app = express();

app.get("/", function (req, res) {
  res.send("Yay Node!");
});

app.listen(3000, function () {
  console.log("Server is listening on port 3000. Ready to accept requests!");
});
Exercise: Try to
console.logtherequestobject inside the handler function. Restart your server, send the request again with Postman, then go to your terminal to see what it looks like. You should see a lot of data come through.
2. Check it out in Postman
Quit your server in the terminal with ctrl + c. Then restart it to run your
new changes.
node server.js
Now, open Postman, and send a GET request to
http://localhost:3000. If you see your message in Postman,
congratulations! You just sent your first response from the server.
Checkpoint: Do you understand all these terms? You should be able to see examples of them in Postman
- [ ] Client
- [ ] Server
- [ ] Front-end
- [ ] Back-end
- [ ] Full stack developer
- [ ] Request
- [ ] Response
- [ ] HTTP
- [ ] HTTP Response Codes
- [ ] HTTP Request Methods (or Verbs)
Step 4 - Routing
At the moment our server only does one thing. When it receives a request from
the / endpoint, it sends back the same response: "Yay Node!".
Try typing http://localhost:3000/node and see what happens.
However by making use of endpoints, we can make the server send different responses for different requests. This concept is called routing.
What is an endpoint?
An endpoint is the part of the URL which comes after /. For example:
/chocolate is the "chocolate" endpoint. It's the URL to which you send a
request.
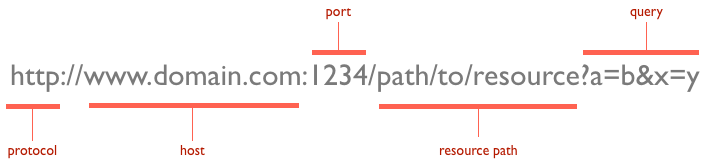
What is URL?
1. Create your own endpoints and send different responses
We're going to try sending different responses at different endpoints. Remember
the app.get() method? To set up routing in your server, we just need to repeat
this method with different endpoints.
For example:
app.get("/", function (req, res) {
  res.send("Hello World!");
});

app.get("/chocolate", function (req, res) {
  res.send("Mm chocolate :O");
});
Exercise: Add some code so that your server sends one message when the endpoint is
/nodeand another one when it's/codeyourfuture.
Step 5 - Query Parameters
So, what is a query parameter?
In simple terms, a query string is the part of a URL (Uniform Resource Locater) after the question mark (?). It is meant to send small amounts of information to the server via the url. This information is usually used as parameters to query a database, or maybe to filter results. It's really up to you what they're used for.
Here is an example of a URL with query strings attached:
1. Detect Query Parameters
We're going to try sending different responses at different endpoints. Remember
the app.get() method? To set up routing in your server, we just need to repeat
this method with different endpoints.
For example:
app.get("/", function (req, res) {
  let searchQuery = req.query.search;
  res.send("Hello World! You searched for " + searchQuery);
});
Exercise: Add some code so that your server returns the amount of chocolate that you want from
/chocolateendpoint. For examplehttp://localhost:3000/chocolate?amount=3
Should return "Mm 3 chocolates :O"
Homework
All of the homework for this week can be found in the Node Homework repository here under the Week 1 folder
Submission
You should complete the tasks in NodeJS-Homework repository.
Make sure you create a branch named [YOUR_NAME]/Week1 for work that you want to submit.
Escalation policy
When you get stuck during the homework you should follow the following:
- First, search for answers on Google and Stack Overflow. If you have an error message, copy and paste it into Google.
- When you are stuck for longer than 20 minutes - no longer! - write a question to your fellow students in your class channel on slack. Take a while to think carefully about the question. This is an important skill. Here is a great guide to writing good questions
- If you cannot get an answer from your fellow students,
post your question in your class public channel,
@the mentor for the class that covered the topic and we will reply as soon as we can.