JavaScript Core II - 2
What we will learn today?
Please make sure you're working on the js-exercises repo Week 5 during this class.
JS in the Browser
Up until now we've been using console.log to see the results of our code running, because it allows us to focus on writing code and seeing the results instantly. But JavaScript was not meant to be run in console.log: it was meant to make web pages pages dynamic.
Lots of websites are powered by JavaScript today, and some (like Facebook) cannot function at all without it: it's become that important to the look and feel of the website.
The DOM
Your webpages are made up of a bunch of HTML elements, nested within each other (parents and children). But JavaScript doesn't know about any of that.
Thankfully, in JavaScript we have access to this "DOM" object (Document Object Model) which is actually a representation of our webpage that JavaScript can work with.
Here are two examples, HTML and then JavaScript, of how the DOM might look like:
<html>
    <body>
        <h1> Welcome! </h1>
        <p> Hello world! </p>
    </body>
</html>
var document = {
    body: {
        h1: "Welcome",
        p: "Hello world!"
    }
};
The DOM offers a lot of useful functions we can use to find elements on the page. Here are some we'll be using today:
    document.querySelector('#mainHeader');
    document.querySelectorAll('p');
Both .querySelector and querySelectorAll accept a CSS selector as an input.
.querySelector selects only the first element it finds, querySelectorAll selects all elements (it returns an array).
Once you retrieve an element using .querySelector, you can attach an event to it. An event is any action that can be performed on that element. For now, we will just use the click event:
    var myButton = document.querySelector('#myButton');
    myButton.addEventListener("click", alertSomething);

    function alertSomething() {
        alert("Something");
    }
You will notice in the example example that we passed a second argument to addEventListener. That second argument is the function that we want to invoke when that event has happened.
The elements returned by document.querySelector have the same properties as a normal HTML element: for example, you can get access to their css styles.
    var myElement = document.querySelector('#myElement');
    myElement.style.backgroundColor = 'red';
Using the document, you can also create new elements. These elements will not appear until you append them as a child of another element though:
    var paragraph = document.createElement('p'); // here we're just creating it, element is not visible yet
    myElement.appendChild(paragraph); // now the element is added to our view, but it's empty
document.createElement accepts as an input any element type. So for example document.createElement('article') will create a new article element.
You can then change the text displayed inside elements using the innerText property:
paragraph.innerText = "How are you?"; // now we can see the text displaying on the screen
We've been using document.querySelector to retrieve a single element.
To retrieve an array of multiple elements (that match a specific class name for example, or a specific tag) we use document.querySelectorAll.
    //change the background of all the paragraph items on our page
    var paragraphs = document.querySelectorAll('p');
    for(var i=0; i<paragraphs.length; i++) {
        paragraphs[i].style.backgroundColor = "blue";
    }
We've learned that style and innerText are properties of DOM elements. Image tags can also have width and height.
While it's really easy to change styles directly on elements using the style property, it is not usually a good idea to mix JavaScript and CSS (see separation of concerns in the first lesson). To solve this, we can use the className property to set the class for an element instead of changing its styles directly:
//before: <div id="myContainer"></div>
var container = document.querySelector('#myContainer');
container.className = "largeBlock";
//after: <div id="myContainer" class="largeBlock"></div>
To get the text from an Input field:
var updateTitleBtn = document.querySelector('#updateTitleBtn');

updateTitleBtn.addEventListener('click', function() {
    var inputBox = document.querySelector('#titleInput');
    var title = inputBox.value;

    var titleElement = document.querySelector('#lessonTitle');
    titleElement.innerText = title;
    inputBox.value = title;
});
The above waits for click on a button. When the button is clicked, it gets the input box element (inputBox variable).
To get the entered text from it, we use the value property: var title = inputBox.value.
Callbacks and Asynchronous Functions
We have already seen callback functions - in the Array methods forEach, map, filter etc. They are functions that are passed as parameter to another function.
Callbacks have another purpose as asynchronous functions. For these type of functions, the callback is called once another function has completed. This allows you to run some other code while you're waiting for something to finish.
function finished() {
  console.log("The task has finished");
}

function thingThatTakesALongTime(callback) {
  //... Task that takes a long time to complete

  callback(); // This is where the 'console.log' happens
}

// Pass the function to 'thingThatTakesALongTime' just like a normal variable
thingThatTakesALongTime(finished);
So far all of the callbacks you have been using have been synchronous. This means your code is executed one line at a time, at the same time, in order. Asynchronous code is not executed in order, and can run at any time, in any order.
An example of this in real life, are phone calls and text messages.
- Phone calls are
synchronousbecause you can't (really) do anything while the other person is speaking. You are always waiting for your turn to respond - Text messages are
asynchronous. When you send a text, you can go away and do something else, until the other person responds.
A simple example of an asynchronous function is setTimeout. This allows you to run a function after a
given time period. The first argument is the function you want to run, the
second argument is the delay (in milliseconds)
// Separate function definition
function myCallbackFunction() {
  console.log("Hello world!");
}
setTimeout(myCallbackFunction, 1000);

// Inline function
setTimeout(function() {
  console.log("Goodbye world!");
}, 500);
Now let's use a timeout and a callback function together:
function finished(result) {
    console.log('Finished! The result is: ' + result)
}

function startWork(stuff, callback) {
    console.log('Starting! The stuff is: ', stuff)
    setTimeout(function() {
        callback(stuff + 50)
    }, 1000)
}

startWork(50, finished)
Exercises
- Using setTimeout, change the background colour of the page after 5 seconds (5000 milliseconds).
- Update your code to make the colour change every 5 seconds to something different. Hint: try searching for
setInterval.Complete the exercises in this CodePen
Promises
Promises are a new(ish) feature of JavaScript. They allow for
writing easier to understand code when dealing with asynchronous functions.

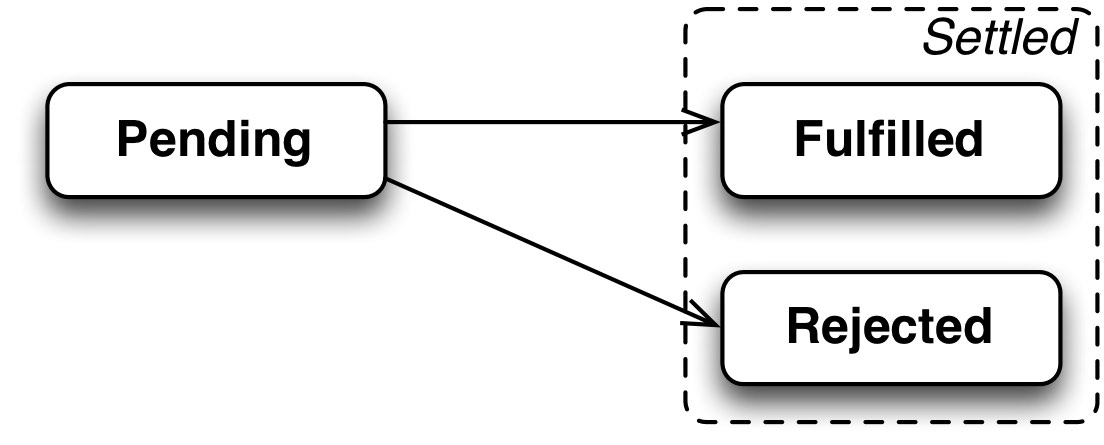
Promises are more "abstract" than anything we have covered so far. They are a data structure that represents some result that is going to happen in the future. The result starts off as being unknown (pending) as the code has not completed yet. The result can then move to be successful (fulfilled) or failed (rejected).
The API is very simple. When you have a Promise, you can attach a .then
method with a callback and/or a .catch method with a callback. If the promise is successful, then the function
in the .then callback is called. If it fails, then the .catch callback is
called.
// Call a function that returns a Promise
var myPromise = functionThatReturnsAPromise();

myPromise.then(function(value) {
  console.log("success: " + value);
});

myPromise.catch(function(value) {
  console.log("fail:" + value);
});
The .then and .catch methods can be chained, like with Array methods:
myPromise.then(function(value) {
  console.log("success: " + value);
})
.catch(function(value) {
  console.log("fail: " + value);
})
You can even return a Promise from within a .then callback, and keep chaining on more .then callbacks. This allows you to process part of the value and keep passing it along the chain:
// myPromise resolves with a value of 50
myPromise.then(function(value) {
  console.log(value) // Logs: 50
  return Promise.resolve(value + 50); // Returns a new Promise
})
.then(function(value) {
  console.log(value) // Logs: 100
})
We will look at some common functions that return a Promise in a bit, but you can also create your own Promise. This example shows a Promise being "resolved" (successful):
var myPromise = new Promise(function(resolve, reject) {
  // Do some work in this function
  resolve(100); // Resolves the Promise with the value 100
});
This example shows a Promise being "rejected" (failed):
var myPromise = new Promise(function(resolve, reject) {
  // Do some work in this function
  reject(50) // Rejects the Promise with the value 50
});
Exercises
Complete the exercises in this CodePen
AJAX
Client/Server architecture
A server is a device or program that provides functionality to other programs or devices. There are database servers, mail servers, game servers, etc. The vast majority of these servers are accessed over the internet. They can take the form of industrial server farms that provide a service to millions of users (used by Facebook, Google, etc.), to personal servers for storing your files.
The server communicates with clients. A client can be a web browser, a Slack app, your phone, etc.
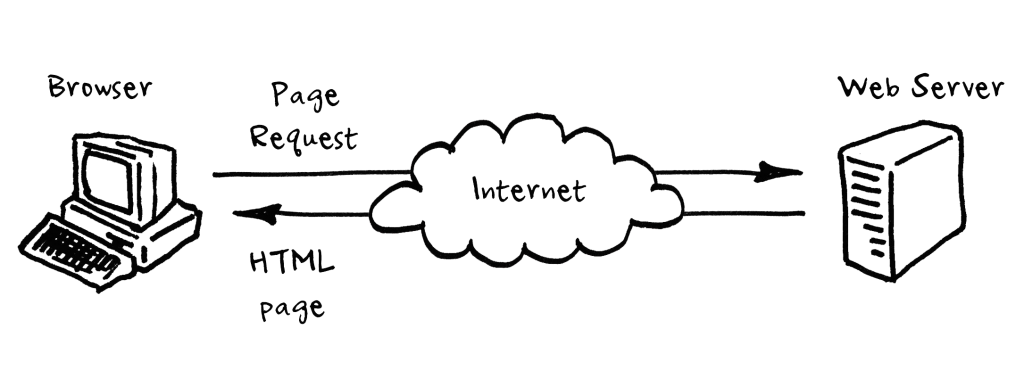
Client–server systems use the request–response model: a client sends a request to the server, which performs some action and sends a response back to the client, typically with a result or acknowledgement.

HTTP Requests
A server stores the data, and the client (other programs or computers) requests data or sends some of its own. But how do they talk to each other?
For the client and the server to communicate they need an established language (a protocol). Which is what HTTP (Hypertext Transfer Protocol) is for. It defines the methods you can use to communicate with a server and indicate your desired actions on the resources of the server.
There are two main types of requests: GET and POST.
| Request type | Description |
|---|---|
| GET | Ask for a specified resource (e.g. show me that photo) |
| POST | Send content to the server (e.g. post a photo) |
HTTP is the language of the internet. In our case we're using Javascript, but you can send HTTP requests with other laguages as well.
What is AJAX?
AJAX is a technique for implementing client-server communication in the browser.
Typically, the server holds the data, and only sends it to the client (web page) when there's a request. AJAX requests are sent after the page has loaded, usually in response to an action by the user. For example when the user clicks a button, some JavaScript will trigger an AJAX request to fetch data.
Introduction to Fetch and asynchronous code
fetch is a way of creating HTTP requests in JavaScript.
fetch('https://codeyourfuture.herokuapp.com/api/hello')
    .then(function(response) {
        return response.text(); // or response.json()
    })
    .then(function(text) {
        console.log(text); // Print 'Hello CodeYourFuture!'
    });
Homework
- The repo contains few challenges - solve all the pending exercises in
week-5andweek-5-practise.
